
In any one app, there is a multitude of screens throughout the app, which the user can navigate to by pressing buttons or completing levels in a game, etc. For more advanced apps, multiple screens are a must, as you may not be able to fit all the desired components onto one screen.
In this lesson, we will be learning how to create multiple screens, and navigate between them easily by using a button. Our target for this lesson is to create a simple “Start” screen for an app/game. When the button is clicked, the app should switch to the second screen.
We can start by pressing the pencil icon in the properties column (shown below), and rename “Screen1” to “Start Screen”. Naming screens is important for more complex apps, so we don’t lose track of what each screen is for and what screen to target with our blocks.

Now, press the “+” button next to Screen1, to create a new screen.

Change the name of Screen2 to “Welcome Screen”. Now navigate to the properties column of this screen, and change the BackgroundColor property to any colour you want, other than white. This is useful so that we know when our screens have changed.
Drag a label onto the Welcome Screen, and change the text to “Welcome!” For a more screen-filling text, change the font size to 50 in the properties column. Your Welcome Screen should look something like this:

Click back to the Start Screen tab, and drag a Button component onto the screen. Change the text of this button to “Press to start!” in the properties column. These are all the components that we will need, but feel free to customize your start screen to your liking (experiment with the button properties for width, height and font size in order to make your button easier to click). Your Start Screen should look something like this:

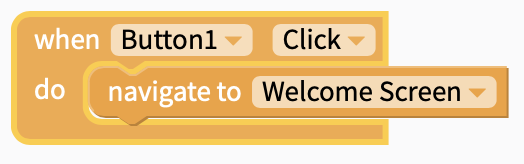
Navigate to the Blocks tab to begin coding your app. First, under Button1, grab a “when Button1 click” block and drag it into your code.
Then, under the Control tab, find the “navigate to Start Screen” block, and drag it into the existing button block. Now select Welcome Screen in the drop-down menu. This causes the app to switch to the welcome screen when the button is clicked.
Your start screen should now be fully operational! Live test your app, and when the start button is clicked, the screen background should switch to the color you chose at the start, and the welcome label should be visible.